Baby Monitor Set Up: Proven 7-Step Guide for UK Homes 2026
Introduction
When parents set up a baby monitor in a UK home, they quickly discover challenges that generic guides never mention. I learned this firsthand helping a friend install theirs in a Victorian terrace — the signal barely reached the hallway, let alone downstairs.
After extensive baby monitor set up testing across various British properties, I’ve found that most instructions ignore UK-specific obstacles entirely. From brick walls that kill wireless signals to WiFi interference in packed neighbourhoods, getting reliable coverage here requires a very different approach.
This guide shares proven baby monitor set up strategies that actually work in challenging UK properties. Whether you’re dealing with thick walls in a period home or WiFi interference in a modern flat, you’ll find practical solutions here.
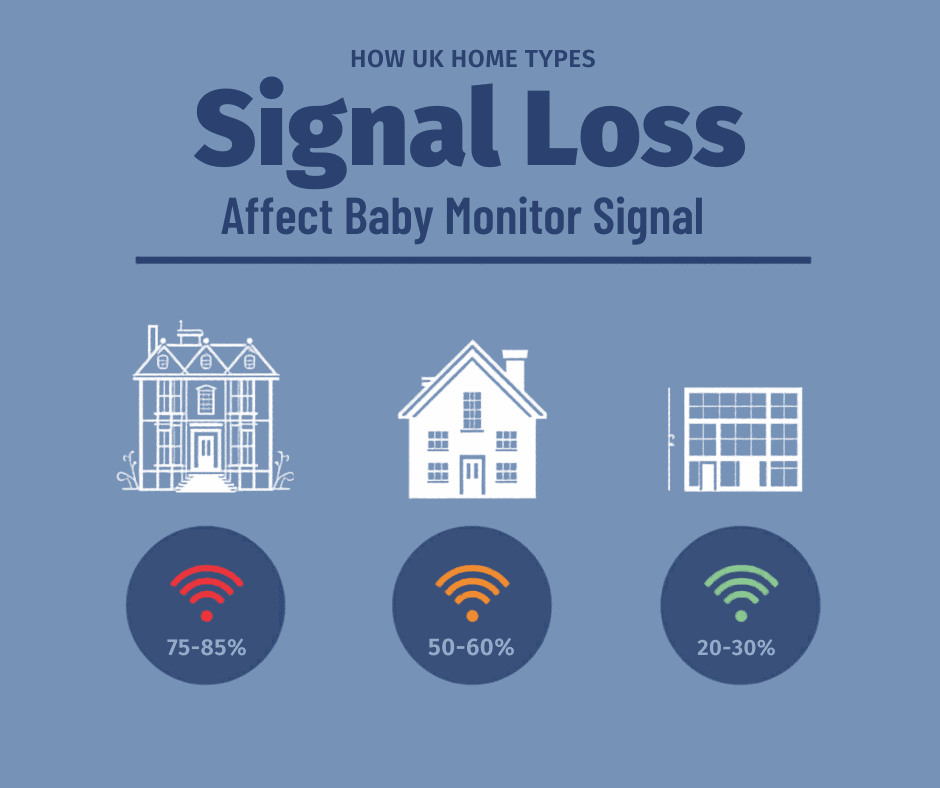
Table of Contents
- Understanding UK Home Challenges
- Pre-Installation Planning
- Optimal Camera Positioning
- Network Configuration
- Troubleshooting Interference
- Safety & Security
- Maintenance Guide
Understanding UK Home Challenges
Why UK Properties Present Unique Problems
Before setting up your monitor, it’s worth understanding why UK homes present unique challenges that most baby monitor guides — written with American homes in mind — simply don’t address.
Generic instructions assume drywall construction. UK homes — especially older properties — present completely different obstacles that can derail even a straightforward installation.
Victorian Properties: The Biggest Challenge
Older homes create serious baby monitor set up difficulties:
- Thick brick walls (9+ inches) reduce signal strength by 75% or more
- Double-brick construction (9–13.5 inches) causes 80–85% signal loss
- Plaster and lath with metal mesh interferes with wireless transmission
- Multiple solid walls severely limit range
- Metal pipes create additional interference
One parent on the MoneySavingExpert forum captured this perfectly: “14th Century stone walls stop WiFi signals dead.”
Modern Builds Still Complicate Things
Even new UK homes present their own challenges:
- Concrete structural elements block signals
- Dense WiFi interference from neighbouring properties
- Metal-framed construction
- Thick cavity walls affecting transmission
The WiFi Interference Problem
According to Ofcom’s wireless interference guidance, the UK’s 2.4GHz band is severely congested.
Router Congestion: Multiple routers create a “busy motorway” effect regardless of provider.
Neighbour Interference: UK housing density means your monitor competes with 10–20 overlapping networks in terraced housing or flats.
Phase 1: Baby Monitor Set Up: Pre-Installation Planning
Choosing the Right Technology
DECT: Best for Challenging Properties
For difficult UK homes, DECT provides the most reliable solution. Operating on 1880–1900 MHz, it excels because:
- Dedicated frequency avoids 2.4GHz congestion
- Superior wall penetration
- No network dependency
- Built-in encryption
DECT consistently outperforms WiFi in Victorian properties. Check our best baby monitors UK guide for tested options.
WiFi Monitors: When They Work
Smart monitors perform well when:
- Strong WiFi covers the entire property
- Dual-band routing is available
- Remote monitoring is needed
- Modern construction is present
Power Compatibility
Before completing your baby monitor set up, check:
- UK plug types (many monitors ship with US plugs)
- 110–240V support
- Cord length for UK room layouts
- Safe cord routing away from the crib
Site Assessment
Successful baby monitor set up starts with a proper survey:
- Map walls between the nursery and your monitoring locations
- Test WiFi strength throughout the coverage area
- Identify interference from microwaves, smart devices, and neighbours
- Check power access near optimal positions
Strategy for Victorian/Period Properties:
- Expect 50% of the advertised range
- Prioritise DECT technology
- Minimise wall obstacles
- Consider multiple monitoring points
Strategy for Modern UK Homes:
- Optimise your network configuration
- Position the router strategically
- Consider mesh networking
- Use dual-band separation
Phase 2: Camera Positioning
Optimal Placement
Getting baby monitor set up positioning right is the most overlooked step — and the easiest to fix.
Height and Angle:
- Mount 6–8 feet from the crib
- Position above baby’s eye level, angled downward
- Avoid direct sunlight
Safety-Critical Cord Management:
- Keep ALL cords 3+ feet from the crib (strangulation prevention)
- Mount high where cords can’t be reached
- Never drape cords near the sleeping area
The 3-foot cord rule addresses strangulation risk — not electromagnetic concerns — following US Consumer Product Safety Commission guidelines introduced after infant fatalities from monitor cords.
Signal Optimisation:
- Minimise wall obstacles between camera and parent unit
- Avoid metal radiators and large mirrors
- Use line-of-sight where possible
Parent Unit Placement
- Keep away from other 2.4GHz devices
- Position centrally for best coverage
- Choose a convenient monitoring spot
UK-Specific Tips:
- Position near stairwells in multi-storey homes
- Use multiple units in thick-walled properties
- Account for neighbour interference in flats and apartments
Phase 3: Network Configuration
Optimising Your WiFi
Proper network configuration is essential for any WiFi baby monitor set up.
Channel Selection:
- Use a WiFi analyser app to find clear channels
- Select channels 1, 6, or 11 (non-overlapping)
- Reserve 2.4GHz for the monitor
Network Segmentation:
- Create a dedicated IoT network
- Use guest network isolation
- Enable Quality of Service (QoS)
Router Optimisation
- Manually select optimal channels
- Update firmware regularly
- Position the router 6–10 feet from the camera
- Enable automatic channel selection
- Consider WiFi 6 upgrades for congested environments
Phase 4: Solving UK Interference Issues
The Thick Wall Challenge
Victorian properties need a specialised approach.
Immediate Solutions:
- Reposition to minimise wall obstacles
- Elevate units for better signal paths
- Test multiple locations before committing
- Switch to DECT for masonry construction
Advanced Solutions:
For the most reliable baby monitor set up in older homes, DECT is the clear choice. When WiFi simply won’t cut through the walls, these advanced solutions can help:
- Invest in long-range DECT monitors
- Identify natural signal corridors in your home
- Position routers strategically near these corridors
- Consider a professional survey for complex layouts
Our baby monitors for large houses guide covers extended coverage solutions in detail.
Managing Neighbour Interference
UK housing density creates significant 2.4GHz congestion.
Assessment:
- Use a WiFi analyser to identify busy channels
- Note peak interference times (evenings are typically worst)
- Map neighbour network impact on your coverage
Mitigation:
- Schedule large downloads away from sleep times
- Coordinate channels with neighbours if possible
- Upgrade to DECT in heavily congested areas
- Move household devices to 5GHz to free up 2.4GHz
Phase 5: Safety and Security
UK Electrical Safety
Following Electrical Safety First guidelines:
- Use only UK-certified adapters
- Ensure proper earthing
- Position outlets safely relative to the crib
- Avoid extension leads in nurseries where possible
Critical Cord Management
Strangulation Prevention:
- Keep cords 3+ feet from the crib at all times
- Never drape cords near sleeping areas
- Mount cameras high, out of reach
- Secure excess cable length with cord management clips
Network Security
Essential Configuration:
- Change default passwords immediately after setup
- Enable WPA3 (or WPA2 as a minimum)
- Disable unnecessary remote access features
- Update firmware regularly
Privacy Settings:
- Review cloud storage policies before enabling
- Disable features you don’t use
- Monitor access logs periodically
- Consider local storage options for sensitive households
Check our baby monitor security guide for comprehensive UK privacy protection advice.
Phase 6: Troubleshooting Common Baby Monitor Set Up Problems
“Out of Range” Issues
Immediate Diagnostics:
- Test in the same room first to rule out device faults
- Check battery levels (weak batteries reduce transmission power)
- Turn off interfering devices temporarily
- Move away from metal objects and thick walls
Solutions:
- Relocate the camera slightly and retest
- Elevate both units
- Consider upgrading to DECT if on WiFi in an older property
In most cases, a simple repositioning resolves 80% of baby monitor set up issues without any additional hardware.
Video Quality Problems
Poor Night Vision:
- Adjust infrared sensitivity settings
- Avoid window glare and street light interference
- Clean the lens regularly
Intermittent Feed:
- Check your broadband speed during drop-out periods
- Update router firmware
- Optimise camera position relative to the router
When to Get Professional Help
Some situations genuinely warrant expert input:
- Persistent thick wall signal problems despite repositioning
- Severe interference with no clear source
- Victorian property optimisation for large or complex layouts
- Additional outlet installation near optimal camera positions
- Home automation integration
Phase 7: Ongoing Maintenance
Regular Checks
Weekly:
- Test range throughout the home
- Check video and audio quality
- Confirm battery performance
Monthly:
- Clean camera lenses
- Test two-way communication
- Review positioning as your child grows
- Assess network performance
Adapting as Your Child Grows
Newborn to Mobile (0–12 months):
- Lower camera angle focused on the crib
- Prioritise audio sensitivity and range
- Focus on sleep monitoring
Toddler Stage (12+ months):
- Wider viewing angles to cover more of the room
- Consider multiple room coverage
- Temperature monitoring becomes more important
For twins or multiples, see our baby monitors for twins guide.
Conclusion
Baby monitor set up in a UK home isn’t plug-and-play— but it doesn’t have to be a battle either. Once you understand the quirks of British construction and local WiFi congestion, the fixes are straightforward. DECT for older properties, proper channel selection for modern flats, and smart positioning regardless of your home type.
Follow these seven steps and your baby monitor set up will give you reliable coverage from night one